복권 긁기 게임을 만들어 보고자 유니티를 켰다.
요즘엔 유니티 에셋중에 scratch card라는 게 있다던데 찾아보니 유료에셋인 것 같아 gpt와 같이 만들어 봤다.
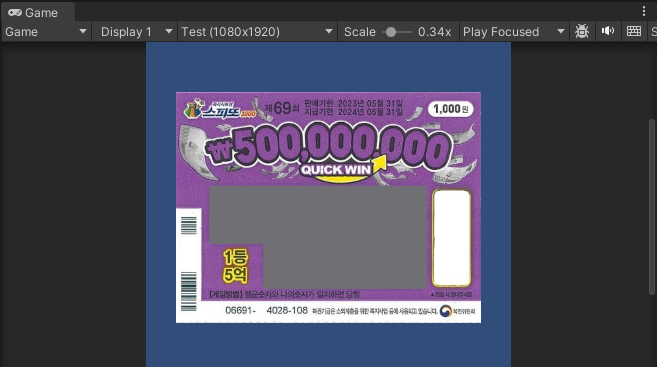
1. 우선 원하는 복권 이미지를 찾고, 스크래치 부분도 복권 이미지에 맞게 하나 만들어 준다.
2. 쉐이더가 두개 필요하다. mask shader와 mask Construction shader를 만들어 주자.
mask shader의 코드
// 메인 텍스쳐와 마스크 텍스쳐를 사용하여 투명도를 조절하는 마스킹 효과를 구현.
// 마스크 텍스쳐의 알파값에 따라 메인 텍스쳐의 투명도가 결정.

Shader "Masked" {
    Properties {
        _MainTex ("Main", 2D) = "white" {} //메인 텍스쳐
        _MaskTex ("Mask", 2D) = "white" {} // 마스크 텍스쳐
    }

    SubShader {
        //렌더링 설정
        Tags {"Queue"="Transparent" "IgnoreProjector"="True" "RenderType"="Transparent"}
        ZWrite Off  // z버퍼 쓰기 비활성화
        ZTest Off   // z테스트 비활성화
        Blend SrcAlpha OneMinusSrcAlpha // 알파 블렌딩 설정
        Pass {
            CGPROGRAM
            #pragma vertex vert     // 버텍스 쉐이더 함수 지정
            #pragma fragment frag   // 프래그먼트 쉐이더 함수 지정
            #pragma fragmentoption ARB_precision_hint_fastest   //프래그먼트 쉐이더 최적화 힌트
            #include "UnityCG.cginc"    // 유니티 내장 함수 포함

            //텍스쳐 샘플러와 변환 매개변수 선언
            uniform sampler2D _MainTex;
            uniform sampler2D _MaskTex;
            uniform float4 _MainTex_ST;
            uniform float4 _MaskTex_ST;

            // 버텍스 쉐이더 입력 구조체
            struct app2vert
            {
                float4 position: POSITION;  // 오브젝트 공간 위치
                float2 texcoord: TEXCOORD0; // 텍스쳐 좌표
            };

            // 버텍스 쉐이더 입려 구조체
            struct vert2frag
            {
                float4 position: POSITION;  // 클립 공간 위치
                float2 texcoord: TEXCOORD0; // 텍스쳐 좌표
            };

            // 버텍스 쉐이더 함수
            vert2frag vert(app2vert input)
            {
                vert2frag output;
                output.position = UnityObjectToClipPos(input.position);    //오브젝트 공간에서 클립 공간으로 변환
                output.texcoord = TRANSFORM_TEX(input.texcoord, _MainTex); //텍스쳐 좌표 변환
                return output;
            }

            // 프래그먼트 쉐이더 함수
            fixed4 frag(vert2frag input) : COLOR
            {
                fixed4 main_color = tex2D(_MainTex, input.texcoord); // 메인 텍스쳐 샘플링
                fixed4 mask_color = tex2D(_MaskTex, input.texcoord); // 마스크 텍스쳐 샘플링

                // 최종 색상 계산 : RGB는 메인 텍스쳐에서, 알파는 메인 텍스쳐와 마스크의 조합
                return fixed4(main_color.r, main_color.g, main_color.b, main_color.a * (1.0f - mask_color.a));
            }
            ENDCG
        }
    }
}
maskConstruction shader 코드
// 기본 텍스처와 마스크 텍스처를 사용하여 마스킹 효과를 구현.
// 마스크 텍스처의 빨간 채널 값에 따라 기본 텍스처의 알파 값(투명도) 조절.
// 마스크 텍스처의 빨간 채널 값이 높을 수록 해당 부분 투명 up.


Shader "MaskConstruction"
{
    //인스펙터에서 조정 가능한 속성 정의
    Properties
    {
        _MainTex ("Base Texture", 2D) = "white" {}  // 기본 텍스쳐
        _MaskTex ("Mask Texture", 2D) = "black" {}  // 마스크 텍스쳐
    }
    SubShader
    {
        Tags { "Queue"="Transparent" }  //투명 객체로 렌더링 큐 설정
        Pass
        {
            ZWrite Off                          // z버퍼 쓰기 비활성화
            Blend SrcAlpha OneMinusSrcAlpha     // 알파 블렌딩 설정

            CGPROGRAM
            #pragma vertex vert                 // 버텍스 쉐이더 함수 지정
            #pragma fragment frag               // 프래그먼트 쉐이더 함수 지정

            #include "UnityCG.cginc"            //유니티 내장 함수 포함

            sampler2D _MainTex;     // 기본 텍스처 샘플러
            sampler2D _MaskTex;     // 마스크 텍스처 샘플러

            // 버텍스 쉐이더 입력 구조체
            struct appdata_t
            {
                float4 vertex : POSITION;   // 오브젝트 공간 위치
                float2 uv : TEXCOORD0;      // 텍스처 좌표
            };

            // 프래그먼트 쉐이더 입력 구조체
            struct v2f
            {
                float2 uv : TEXCOORD0;       // 텍스처 좌표
                float4 vertex : SV_POSITION; // 클립 공간 위치
            };

            // 버텍스 쉐이더 함수
            v2f vert (appdata_t v)
            {
                v2f o;
                o.vertex = UnityObjectToClipPos(v.vertex); // 오브젝트 공간에서 클립 공간으로 변환
                o.uv = v.uv;                               // 텍스처 좌표 전달
                return o;
            }

            // 프래그먼트 쉐이더 함수
            fixed4 frag (v2f i) : SV_Target
            {
                fixed4 baseColor = tex2D(_MainTex, i.uv); // 기본 텍스처 샘플링
                fixed4 maskColor = tex2D(_MaskTex, i.uv); // 마스크 텍스처 샘플링

                // 마스크를 기본 텍스처에 적용
                baseColor.a *= (1 - maskColor.r); // 마스크 텍스처의 빨간 채널을 기반으로 지우기 효과 적용

                return baseColor; //최종 색상 반환
            }
            ENDCG
        }
    }
}
주석으로 설명은 달아뒀으니 shader가 궁금한 사람은 주석을 보며 더 공부해 보는 걸 추천한다.
3. 유니티에서 Scratch_Result 오브젝트를 만들어 주고 이전에 준비했던 복권 이미지를 넣어준다.
4. Scratch_Surface 오브젝트를 만들어 주고 자식으로 camera 하나와 surface 오브젝트 하나를 준비해 준다.
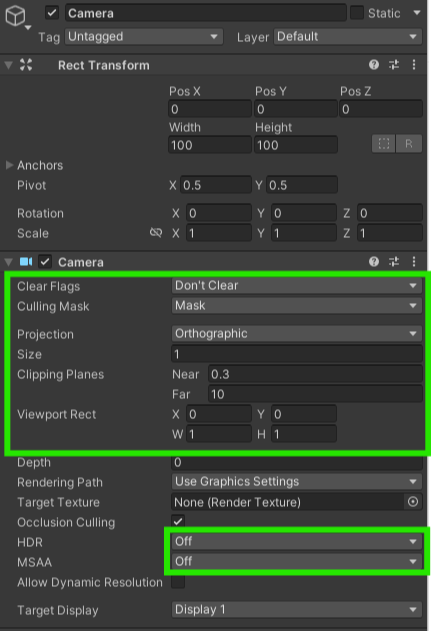
카메라 옵션을 위와 같이 바꿔주고 Surface 오브젝트에는 스프라이트 렌더러 컴포넌트를 추가해 준다. 여기서 복권의 스크래치 회색 부분을 sprite에 넣어 주면 되고 material을 새롭게 만들어 넣어주자.
카메라의 Clear Flags를 Don't Clear로 설정해주면서 프레임 누적효과로 이전 프레임위에 프레임이 그려져 누적되는 효과를 만들 수 있는데 이걸로 지워지는 효과를 줄 수 있다. 이 설정으로 번짐이나 잔상 효과도 만들어 낼 수 있을 듯?
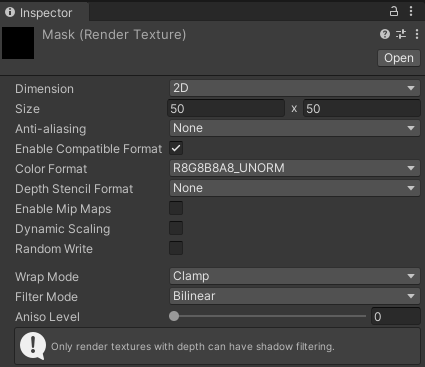
우선, Assets 폴더에 Textures 폴더를 만들어 주고 우클릭을 통해 Render Texture를 만들어 준다.
다시 Assets파일로 가서 Materials 폴더를 만들어 주고 우클릭을 통해 Material을 만들어 준다.
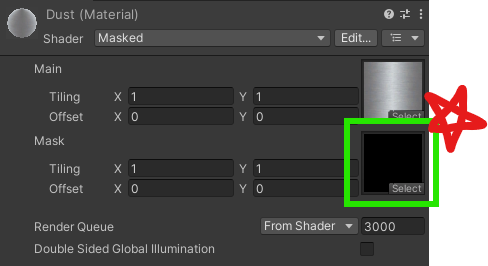
여기서 중요한 점은 shader를 아까 만들어 준 Masked로 연결해 주는 것. 그리고 저 별표 쳐둔 곳에 아까 만든 Render Texture를 연결해 주자.
다 만들어 줬다면 Material을 복사해서 하나 더 만들어 주고 이름을 Eraser로 바꿔준다. 그리고 shader를 maskConstruction으로 설정해 두자.
Surface 오브젝트로 돌아와서 mask shader로 만들어 준 Material을 연결해 준다.
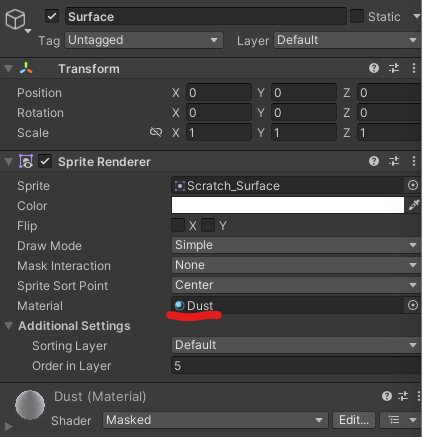
여기서 Order in Layer값은 아까 만들어 준 Scratch_result보다 높게 수치를 정해주자.
5. 이제 거의 다 왔다. camera에 달아줄 스크립트를 만들어주자.(main camera 아님 주의!)
>> 픽셀로 검사해서 전체 진행률을 확인해보려 하다가 내 surface의 크기를 전체 픽셀로 체크를 해야 되는데 제대로 체크가 안돼서 박스 콜라이더로 진행률을 확인하는 걸로 바꿨다.
>> 박스 콜라이더로 작업을 하면 원하는 방향대로 진행되지 않음을 확인, 렌더 텍스처와 박스콜라이더를 연동해서 작업해 보고 있는 중이다. 이건 추후에 업로드하겠다.
진행률을 안 할 거라면 그냥 이 코드를 적용해 주면 된다. 진행률 부분이 잘 안되는 것 빼고 잘 된다. 작업할 때 잘 안돼서 디버그가 많은데 필요 없다면 알아서 지워주자.
using System.Collections;
using System.Collections.Generic;
using UnityEngine;
using System;
public class MaskCamera : MonoBehaviour
{
    public GameObject Dust; // 긁을 수 있는 표면 오브젝트
    public Material EraserMaterial; // 지우개 효과를 위한 머티리얼
    private RenderTexture renderTexture; // 마스크용 렌더 텍스처
    private Texture2D tex; // 픽셀 데이터를 읽기 위한 텍스처

    private Rect screenRect; // 긁기 가능한 영역
    private Action<float> progressCallback; // 진행률 콜백

    private bool requestReadPixels = false;

    private void Start()
    {
        InitializeRenderTexture();
        CalculateScreenRect();

        Debug.Log(Dust.GetComponent<Renderer>().material.GetTexture("_MaskTex"));
    }

    private void InitializeRenderTexture()
    {
        // 렌더 텍스처 초기화
        renderTexture = new RenderTexture(Screen.width, Screen.height, 0, RenderTextureFormat.Default);
        renderTexture.Create();

        tex = new Texture2D(renderTexture.width, renderTexture.height, TextureFormat.RGB24, false);

        // 카메라와 Dust 오브젝트에 렌더 텍스처 연결
        GetComponent<Camera>().targetTexture = renderTexture;
        Dust.GetComponent<Renderer>().material.SetTexture("_MaskTex", renderTexture);

        Debug.Log($"RenderTexture width: {renderTexture.width}, height: {renderTexture.height}");
    }

    private void CalculateScreenRect()
    {
        // Dust 오브젝트의 화면 영역 계산
        Renderer dustRenderer = Dust.GetComponent<Renderer>();
        screenRect = new Rect(
            dustRenderer.bounds.min.x,
            dustRenderer.bounds.min.y,
            dustRenderer.bounds.size.x,
            dustRenderer.bounds.size.y
        );
        Debug.Log($"ScreenRect initialized: {screenRect}"); // screenRect 값 확인
    }

    public void SetProgressCallback(Action<float> callback)
    {
        progressCallback = callback;
    }

    private void Update()
    {
        if (Input.GetMouseButton(0))
        {
            // 카메라의 viewport 좌표로 변환
            Vector2 viewportPoint = GetComponent<Camera>().ScreenToViewportPoint(Input.mousePosition);

            // viewport 좌표를 직접 사용 (0-1 범위)
            Vector2 localPosition = new Vector2(viewportPoint.x, viewportPoint.y);

            // screenRect 체크는 유지
            Vector2 worldPosition = GetComponent<Camera>().ScreenToWorldPoint(Input.mousePosition);
            if (screenRect.Contains(worldPosition))
            {
                Debug.Log($"Viewport Position: {viewportPoint}");
                CutHole(localPosition);
            }
        }

        if (requestReadPixels)
        {
            ReadPixelsAndCalculateProgress();
            requestReadPixels = false;
        }
    }

    private void CutHole(Vector2 normalizedPosition)
    {
        Debug.Log($"CutHole called at position: {normalizedPosition}");

        RenderTexture.active = renderTexture; // RenderTexture 활성화

        GL.PushMatrix();
        GL.LoadPixelMatrix(0, renderTexture.width, renderTexture.height, 0);
        if (!EraserMaterial.SetPass(0))
        {
            Debug.LogError("Failed to set material pass!");
            return;
        }

        float size = 50f; // 지우개 크기를 픽셀 단위로 설정
        Vector2 pixelPos = new Vector2(
            normalizedPosition.x * renderTexture.width,
            (1- normalizedPosition.y) * renderTexture.height
        );

    	// 사각형 그리기 시작과 종료. color는 사각형 색상, Vertex3()는 사각형 꼭지점 정의.
        // pixelPos는 사각형 중심 위치, size는 사각형의 절반 크기, z값은 0으로 2D 평면에 그림.
        GL.Begin(GL.QUADS);
        GL.Color(Color.white);
        GL.Vertex3(pixelPos.x - size, pixelPos.y - size, 0);
        GL.Vertex3(pixelPos.x + size, pixelPos.y - size, 0);
        GL.Vertex3(pixelPos.x + size, pixelPos.y + size, 0);
        GL.Vertex3(pixelPos.x - size, pixelPos.y + size, 0);
        GL.End();

        GL.PopMatrix();
        RenderTexture.active = null;
    }

    private void ReadPixelsAndCalculateProgress()
    {
        tex.ReadPixels(new Rect(0, 0, renderTexture.width, renderTexture.height), 0, 0);

        float percentScratched = CalculateScratchedPercent(tex);

        progressCallback?.Invoke(percentScratched);
    }

    private float CalculateScratchedPercent(Texture2D texture)
    {
        int scratchedPixels = 0;

        for (int x = 0; x < texture.width; x++)
        {
            for (int y = 0; y < texture.height; y++)
            {
                if (texture.GetPixel(x, y).r == 1) scratchedPixels++;
            }
        }

        return scratchedPixels * 100f / (texture.width * texture.height);
    }

    public void RequestProgressUpdate()
    {
        requestReadPixels = true;
    }
}
여기서 CutHole() 함수가 제일 중요하다. 렌더 텍스처에 흰 사각형을 그려주고 이 사각형이 마스크로 사용되면서, 아까 설정해주었던 Surface에 자식으로 만들어 준 카메라의 Don't Clear 설정으로 인해 이전에 그려진 사각형들이 지워지지 않고 누적되어서 긁히고 있는 것처럼 보여준다. 플레이어가 마우스를 누를 때마다 반복적으로 함수를 호출해서 실제로 복권을 긁는 것처럼 시각적 효과를 낼 수 있다.
'유니티' 카테고리의 다른 글
| 유니티 ) 카메라 stack을 사용해보자. (0) | 2025.01.23 |
|---|---|
| 유니티 복권 긁기 기록용 스크립트. 수정중 - 박스 콜라이더 스크립트 (0) | 2024.12.18 |
| 유니티 ) h8man님의 pseudo 3d game 뜯어봄. + 장애물도 넣어봄. (1) | 2024.12.10 |
| 유니티 ) 내 방식대로 만드는 pseudo 3d game 2. (2) | 2024.12.03 |
| 유니티 ) 내 방식대로 만드는 pseudo 3d game 1. (0) | 2024.11.26 |